
How to Sandbag
Purpose of Sandbagging
Sandbags are a good way to reduce flood water damage, and when they are properly filled and placed, the sandbags can act as a barrier to moving water around instead of through buildings.
Sandbags will leak, and it’s best to have a pump on the dry side to remove water that gets in. Also, for people in flood-prone areas, the City recommends homeowners have a pump on hand ahead of time. Pumps are harder to find during flood events, so homeowners should buy a pump to have just in case.
Sandbags do not necessarily need to be tied. During the historic flooding in 2018, the City of Madison tied all the sandbags the City provided. The City provided over 200,000 filled sandbags to residents.
Tied sandbags may be used in situations such as:
- When pre-filling and stockpiling is required
- Filling holes
- Holding objects in position
- Form barriers backed by supportive planks
Do not use:
- Garbage bags
- Feed sacks
The most common sizes for a sandbag are 14 by 26 inches to 17 by 32 inches. A typical sandbag weighs about 30 pounds. Thirty sandbags are equal to approximately ½ ton (one ton is 2000 pounds) and is the maximum legal load limit for a ½ ton truck.
How to Fill Sandbags
- First, find gloves. Filling sandbags is a two-person operation. Both people should wear gloves to protect their hands.
- Person No. 1 should fold the throat of the bag to form a collar.
- Person No. 1 should then place the bag between widespread feet on ground and hold bag out for Person No. 2. Person No.1 should be standing with knees slightly flexed, and head and face as far away from the shovel as possible.
- Second person should empty a shovel full of sand into the open end carefully. Do not rush filling, it may cause unnecessary spilling and added work.
Bags should be filled between one-third to one-half of the bag’s capacity. This keeps the bag from getting too heavy and allows the bags to be stacked with a good seal.
For large scale operations, sandbags can be filled faster with bag-holding racks, metal funnels and power loading equipment.
Sandbag Placement

- Remove any debris from the area where bags will be placed.
- Fold the open end of the unfilled portion of the bag to form a triangle. If tied bags are used, flatten or flare the tied end.
- Place the partially-filled bags lengthwise and parallel to the direction of flow. The open end should face against the water flow.
- Tuck the flaps under, keep the unfilled portion under the weight of the sack.
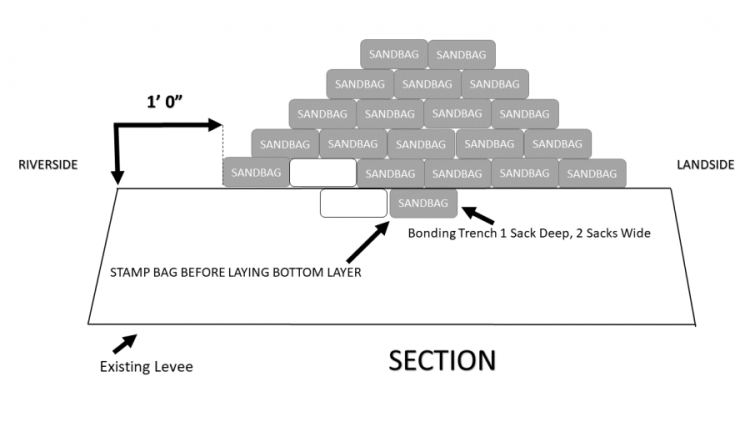
- Place remaining bags on top, offsetting by one-half filled length of previous bag, and stamp into place to make a tight seal.
- Stagger the joint connections when multiple layers are necessary.
- For unsupported layers over three courses high, use the pyramid placing method.
Pyramid Placement is an option for anyone who wants to increase the height of sandbag protection. To do this method, follow these steps:
- Place sandbags to form a pyramid by alternating placing bags crosswise and lengthwise.
- Stamp each bag in place, overlap sacks, maintain staggered joint placement and tuck in any loose ends.
The City of Madison recommends wrapping the sandbag levee in plastic and place filled sandbags on plastic to weigh it down.
Monitor the Bags
Sandbags deteriorate when exposed to continued wetting and drying for several months. If bags are placed too early, they may not be effective when needed.